

How to Detect and Remove XMRig-Based Crypto-Mining Malware on Windows Servers
Introduction
When operating a Windows Server, ensuring system security is one of your most important responsibilities. Whether you are managing a VPS, dedicated server, or cloud server, you must know how to detect and remove crypto-mining malware such as XMRig, which is commonly deployed by attackers to secretly mine cryptocurrency using your server’s CPU.
This step-by-step guide is based on a real XMRig mining infection case. It will show you how to detect abnormal users, suspicious processes, unauthorized services, miner traffic, and malicious files — and how to completely remove XMRig-based crypto-mining malware from your Windows Server.
Why Detecting Mining Malware Is Important
Crypto-mining malware is one of the most common types of Windows Server compromises. Attackers deploy XMRig miners to steal CPU resources, causing serious performance and security issues:
- High CPU load – XMRig miners often consume 50–100% CPU.
- Hidden backdoors – Hackers may create hidden accounts like user0 for persistent access.
- Unauthorized services – Malicious services such as “ZephyrMiner” may be installed to restart the miner.
- Network abuse – Infected servers send traffic to mining pools, increasing bandwidth usage.
- System instability – Mining malware may modify registry startup entries or drop files inside system directories.
Detecting and removing mining malware early is critical to maintaining Windows Server security.
Step-by-Step Guide to Check Server Security
Step 1: Enable Task Manager
Some malware may disable Task Manager to prevent you from identifying or ending malicious processes. Ensure Task Manager is enabled before continuing.
To enable Task Manager:
- Open Registry Editor (regedit.exe).
- Navigate to:
HKEY_CURRENT_USER\Software\Microsoft\Windows\CurrentVersion\Policies\System- If the key DisableTaskMgr exists, set its value to 0. If it does not exist, create a DWORD (32-bit) value named DisableTaskMgr and set it to 0.
Alternatively, you can run this PowerShell command to enable Task Manager:
$regPath = "HKCU:\Software\Microsoft\Windows\CurrentVersion\Policies\System"
if (!(Test-Path $regPath)) {
    New-Item -Path "HKCU:\Software\Microsoft\Windows\CurrentVersion\Policies" -Name "System" -Force | Out-Null
}
Set-ItemProperty -Path $regPath -Name DisableTaskMgr -Value 0 -Force
Write-Host "Task Manager enabled."
After this, you will be able to open Task Manager to view and terminate suspicious processes.
Step 2: Check for Unauthorized or Abnormal Users
Attackers often create extra accounts for persistent access—for example, the suspicious account user0 seen in this incident.
- Open Computer Management → Local Users and Groups.
- Look for unexpected accounts (e.g., strange names, temporary accounts, or accounts recently created, like "user0").
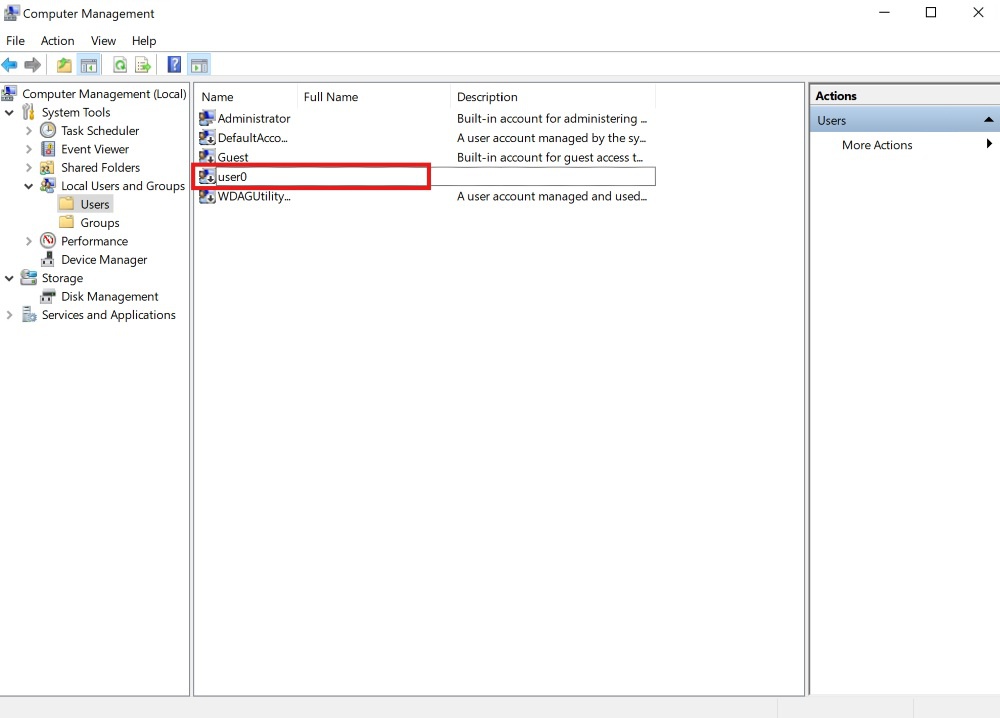
- If you identify suspicious accounts:
- Sign out the user session (if logged in).
- Delete the user account.
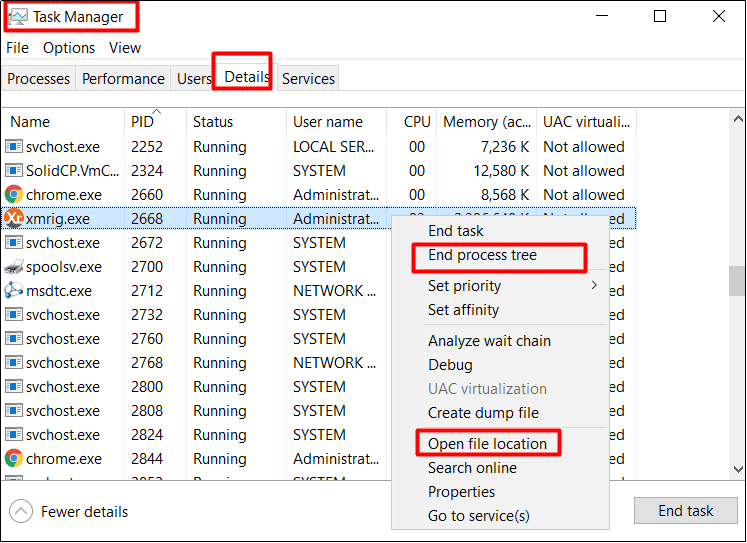
Step 3: Check for Abnormal Processes
Mining malware like XMRig typically consumes large amounts of CPU.
3.1 High CPU or Memory Usage
- Open Task Manager.
- Sort by CPU or Memory usage.
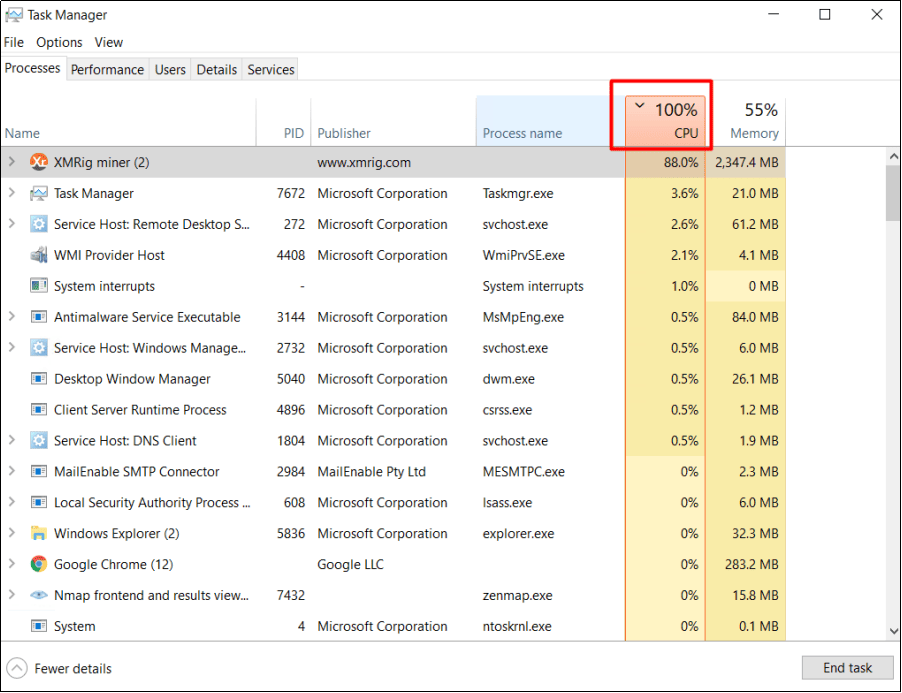
- Look for unusual processes such as
xmrig.exe(commonly used for illegal cryptocurrency mining).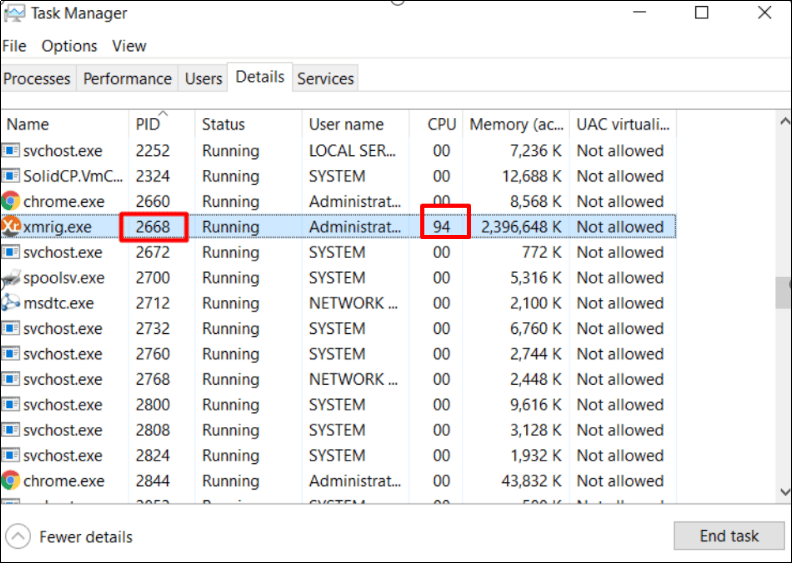
3.2 Suspicious Publishers
- In Task Manager, right-click the column header and enable Publisher.
- Look for processes without a trusted publisher.
3.3 Abnormal Connections
- Open Command Prompt and run:
netstat -ano- Look for many connections from the same PID.
- Run:
tasklist | findstr "PID"(replace PID with the actual number) to identify the program using that connection.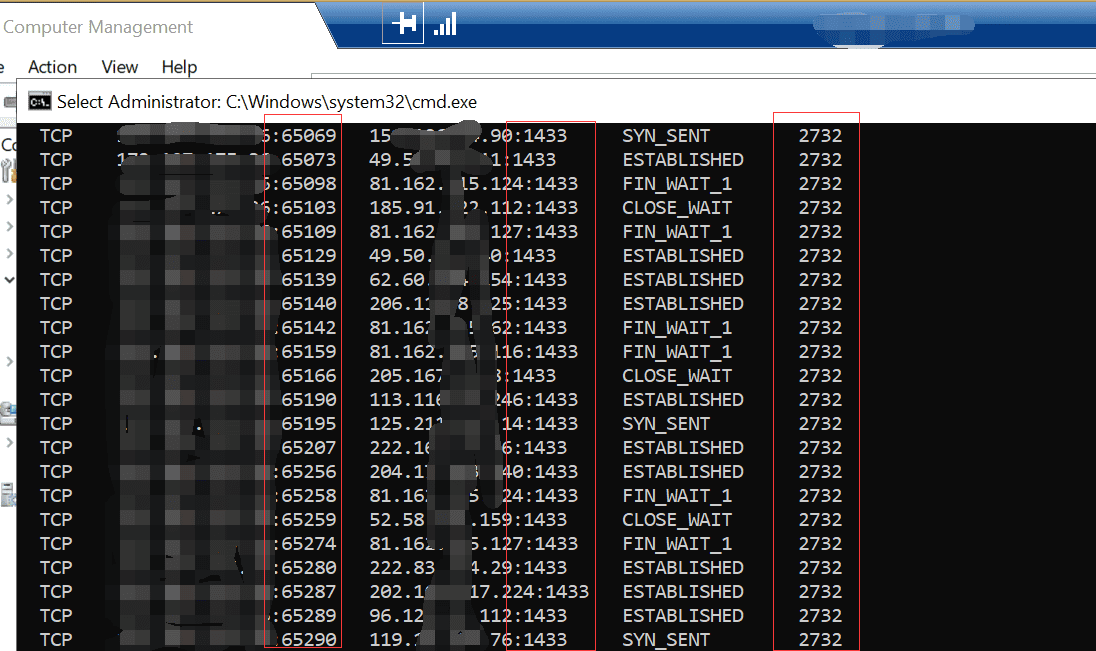
3.4 End Malicious Processes
- Right-click the suspicious process → End Process Tree.
- Select Open File Location and delete related files.
Removing malicious processes is a big step towards Windows Server security and VPS security.
Step 4: Check and Disable Malicious Services
In this incident, attackers installed a malicious service named ZephyrMiner to maintain persistence.
- Open
Services (services.msc). - Look for suspicious services such as: ZephyrMiner, RigelMiner or other Mining-related names
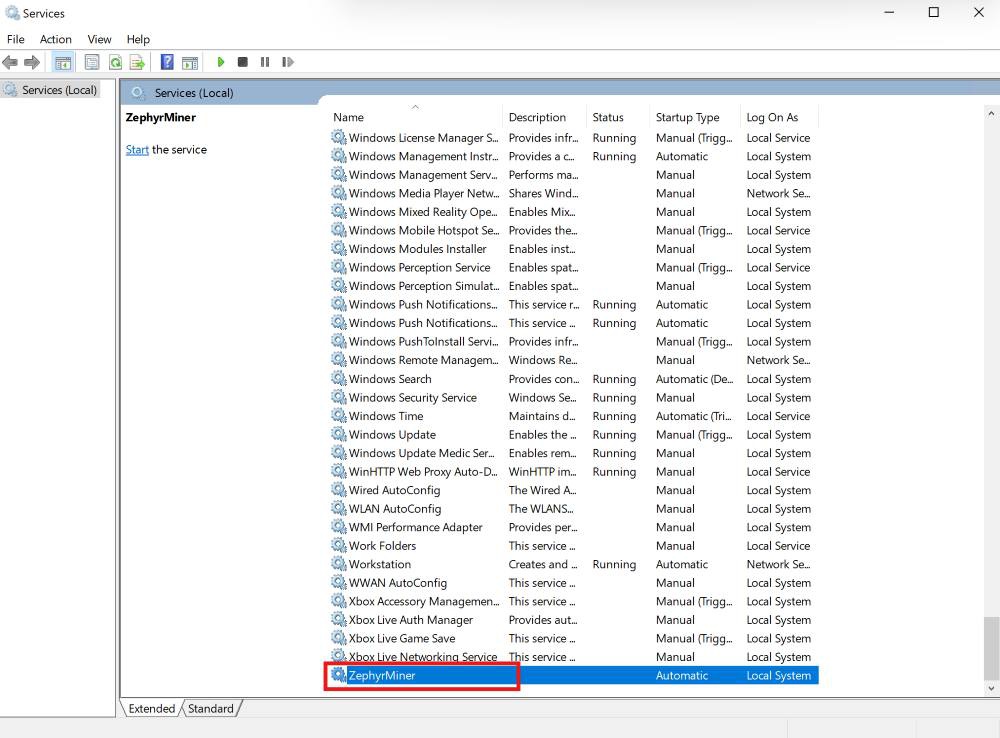
- To stop and disable:
Stop-Service ZephyrMiner -Force
Set-Service ZephyrMiner -StartupType Disabled
(replace ZephyrMiner with the actual service name).
If no such service exists, you may still be infected, and a full malware scan is recommended.
Step 5: Check and Remove Mining Files
XMRig miners typically hide inside:
C:\Users\Administrator\AppData\Roaming\.sysupdate\Inside this directory, you may find: xmrig-* directory.
Delete the entire folder:
Remove-Item "C:\Users\Administrator\AppData\Roaming\.sysupdate" -Recurse -ForceStep 6: Check Registry Startup Entries
Mining malware often adds auto-start registry keys:
HKCU\Software\Microsoft\Windows\CurrentVersion\Run
HKLM\Software\Microsoft\Windows\CurrentVersion\Run
HKLM\Software\WOW6432Node\Microsoft\Windows\CurrentVersion\Run
HKCU\Software\Microsoft\Windows\CurrentVersion\RunOnce
HKLM\Software\Microsoft\Windows\CurrentVersion\RunOnce
Remove any entries referencing:
- xmrig
- .sysupdate
- any other suspicious paths
Startup persistence is crucial for miners to relaunch after reboot.
Step 7: Run a Full Windows Server Antivirus Scan
Running a Windows Server antivirus scan is one of the best ways to detect infections.
Use Windows Defender to scan all drives. If threats are found, click Clean Up to remove them.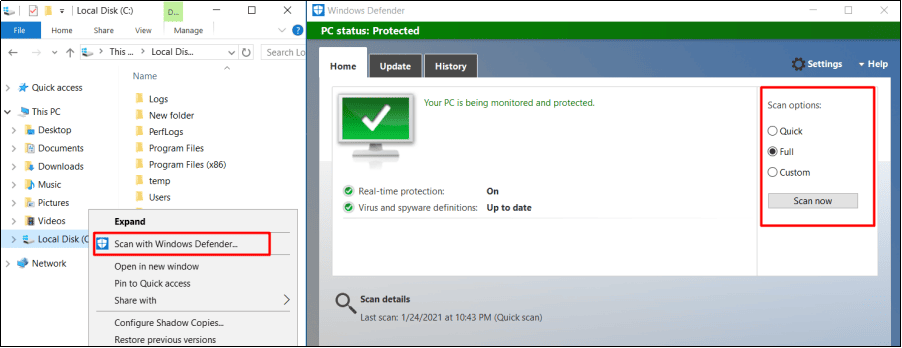
You can also use third-party Windows Server anti-virus solutions for additional server protection.
Additional Tools for Quick Detection and Cleanup
To simplify the process, we provide two automated PowerShell scripts that can help you quickly check and remove XMRig mining components.
- Quick Check & Cleanup Script
This script performs a fast scan for suspicious users, processes, miner files, and startup entries. Run scripts below in powershell:
[Net.ServicePointManager]::SecurityProtocol = [Net.SecurityProtocolType]::Tls12;
$wc = New-Object Net.WebClient;
$wc.Encoding = [Text.Encoding]::UTF8;
IEX ($wc.DownloadString('https://gitlab.cloudclusters.net/public_package/dbm-script/-/raw/master/Check_Miner.ps1'))- Removal Script for Malicious Mining Services
If your server contains persistent malicious services (such as ZephyrMiner or other hidden miner services), run the services cleanup script:
[Net.ServicePointManager]::SecurityProtocol = [Net.SecurityProtocolType]::Tls12;
$wc = New-Object Net.WebClient;
$wc.Encoding = [Text.Encoding]::UTF8;
IEX ($wc.DownloadString('https://gitlab.cloudclusters.net/public_package/dbm-script/-/raw/master/Delete_Miner_Service.ps1'))
These scripts help automate the cleanup process and ensure all miner components are removed.
If you encounter any issues during the scan or cleanup process, please open a support ticket (TK) and we will assist you immediately.
Conclusion
XMRig-based crypto-mining malware is a common threat to Windows Servers, causing high CPU usage, service instability, and security risks. By checking for abnormal users, suspicious processes, unauthorized services, persistent registry entries, miner network traffic, and malicious files, you can effectively identify and remove a mining infection.
Whether you manage a VPS or a cloud server, following this guide will help you strengthen your Windows Server security and fully eliminate XMRig miner malware.
secure server, vps security, server security, cloud server security, windows server antivirus, windows server anti virus, server protection, protect server, windows server security, mining malware, xmrig