


How to Set Up DKIM on ISPConfig
Introduction
If you are running your own mail server, one of the most important things you can do is set up DKIM (DomainKeys Identified Mail). DKIM ensures that your emails are digitally signed with a public-private key pair, proving they come from your authorized mail server. Correct DKIM settings help reduce the risk of your emails being flagged as spam.
This step-by-step guide will cover:
- How to set up DKIM on ISPConfig
- How to configure DKIM with Postfix on Ubuntu, Debian, and CentOS
- How to create a DKIM record and add a DKIM record to DNS
- How to test and verify your DKIM configuration
Why is DKIM Important?
Before we dive into setting up DKIM, let’s understand why it matters:
- DKIM digitally signs each outgoing email with a private key.
- The receiving mail server verifies the signature using the public key stored in your DNS TXT record.
- This process ensures emails are truly from your domain and helps prevent spoofing or phishing.
- Setting up DKIM improves email deliverability and prevents your messages from being marked as spam.
Part 1: Setting Up DKIM on ISPConfig
If you are using ISPConfig, the process is simple.
Step 1: Make Sure OpenDKIM is Installed
Before you configure DKIM in ISPConfig, install opendkim:
sudo apt-get install opendkim opendkim-tools -yStep 2: Log In to ISPConfig
- Open ISPConfig in your browser.
- Navigate to:
Email > Domain > DomainKeys Identified Mail (DKIM)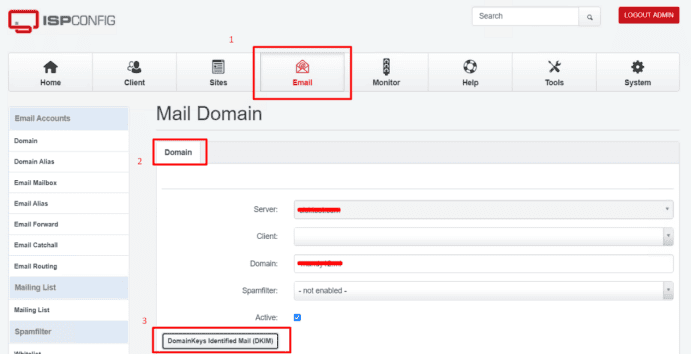
Step 3: Generate DKIM Keys
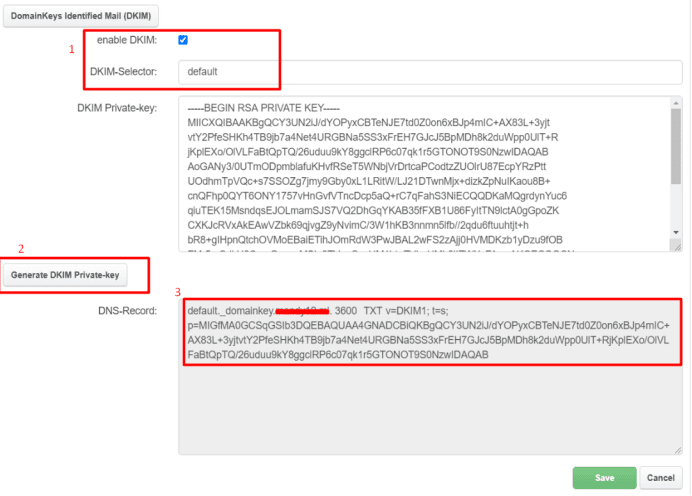
- Select "enable DKIM" and check the "DKIM-Selector" to the default
- Click "Generate DKIM Private-key".
- ISPConfig will generate a private key and a DNS TXT record containing the public key.
Step 4: Add the DKIM Record to DNS
- Copy the generated TXT record.
- Go to your DNS hosting provider.
- Add a DKIM record (TXT type) with the value ISPConfig provided.
This step completes your DKIM settings for ISPConfig.
Part 2: Setting Up DKIM with Postfix on Linux
Now, let’s learn how to set up DKIM on a mail server running Postfix.
We’ll use example.com in the examples.
A. DKIM Setup on Ubuntu/Debian
Step 1: Install OpenDKIM
sudo apt-get install opendkim opendkim-tools -yStep 2: Generate DKIM Keys
MYDOMAIN=example.com
mkdir -p /etc/mail/dkim-keys/$MYDOMAIN
cd /etc/mail/dkim-keys/$MYDOMAIN
opendkim-genkey -t -s mail -d $MYDOMAIN
This creates two files:mail.private → private key (for server)mail.txt → public key (to create DKIM record in DNS)
Step 3: Configure OpenDKIM
- Edit
/etc/mail/dkim.keyand add:
*@example.com:example.com:/etc/mail/dkim-keys/example.com/mail.private- Edit
/etc/opendkim.confand update:
Domain    example.com
KeyFile   /etc/mail/dkim.key
Selector  mail
Socket    inet:8892@localhost
Step 4: Configure Postfix
Edit /etc/postfix/main.cf and add:
milter_default_action = accept
milter_protocol = 2
smtpd_milters = inet:localhost:8892
non_smtpd_milters = inet:localhost:8892
Step 5: Add DKIM Record to DNS
- Open
/etc/mail/dkim-keys/example.com/mail.txt. - Copy the TXT record.
- Go to your DNS provider and add a DKIM record.
Step 6: Restart Services
sudo service opendkim restart
sudo service postfix restart
B. DKIM Setup on CentOS
Step 1: Install OpenDKIM
yum install opendkim -yStep 2: Generate DKIM Keys
MYDOMAIN=example.com
mkdir -p /etc/opendkim/keys/$MYDOMAIN
cd /etc/opendkim/keys/$MYDOMAIN
opendkim-genkey -r -d $MYDOMAIN
Set permissions:
chown -R opendkim:opendkim /etc/opendkim
chmod go-rw /etc/opendkim/keys
Step 3: Configure OpenDKIM
Edit /etc/opendkim.conf:
Mode     sv
Socket   inet:8891@localhost
Domain   example.com
KeyTable        /etc/opendkim/KeyTable
SigningTable    refile:/etc/opendkim/SigningTable
ExternalIgnoreList refile:/etc/opendkim/TrustedHosts
InternalHosts   refile:/etc/opendkim/TrustedHosts
Step 4: Add Key and Signing Tables
/etc/opendkim/KeyTable
default._domainkey.example.com example.com:default:/etc/opendkim/keys/example.com/default.private/etc/opendkim/SigningTable
*@example.com default._domainkey.example.com/etc/opendkim/TrustedHosts
mail.example.com
example.com
Step 5: Configure Postfix
Edit /etc/postfix/main.cf:
smtpd_milters = inet:127.0.0.1:8891
non_smtpd_milters = $smtpd_milters
milter_default_action = accept
Step 6: Add DKIM Record to DNS
- Open
/etc/opendkim/keys/example.com/default.txt. - Copy the TXT record.
- Add a DKIM record in your DNS provider.
Step 7: Restart Services
sudo service opendkim restart
sudo service postfix restart
Part 3: Verify DKIM is Working
Step 1: Send Test Email
mail -vs "Test DKIM" test_email@gmail.com < /dev/nullStep 2: Check Email Headers
Open the email in Gmail or any mail client. Look for a header similar to:
DKIM-Signature: v=1; a=rsa-sha256; c=simple/simple; d=example.com;
s=mail; ...
If you see DKIM-Signature, your DKIM setting is working correctly.
Conclusion
By following this guide, you have learned:
- How to set up DKIM on Linux (Ubuntu/Debian & CentOS) and ISPConfig
- How to configure DKIM with Postfix
- How to create a DKIM record and add a DKIM record to DNS
- How to test and verify DKIM is working
Correct DKIM settings improve email deliverability and protect your domain from being abused for spam.
Now your server is fully equipped with DKIM authentication, ensuring recipients trust your emails.
setting up dkim, set up dkim, create dkim record, add a dkim record, configure dkim, dkim setting, create dkim