

Site-to-Site VPN: How to Configure VPN on Cisco ASA
Introduction
This tutorial shows, step-by-step and in plain language, how to set up a Site-to-Site VPN between your Cisco ASA5500 (Database Mart firewall in examples below) and a remote peer device using Cisco ASDM (the ASA GUI). The remote peer (client end) must use the same parameters (IP, IKE, IPsec, pre-shared key, networks) for the tunnel to form.
Prerequisites
- ASA/ASDM version: Make sure your ASA is on 8.2.2 or newer (ASA 8.2.1 has a known issue that can prevent some Windows clients from connecting). You can check in ASDM or via CLI (
show version). - Administrative access: You need admin access to ASDM on the ASA and corresponding access to the remote peer device.
- No NAT between peers: The public IPs used for the VPN peers must be the real WAN IPs (not internal addresses behind NAT), or ensure NAT-exemption is in place.
- Time sync: Both sides should have the correct system time (NTP recommended).
- Firewall rules: Ensure UDP/500, UDP/4500 (if NAT-T), and ESP (protocol 50) traffic are allowed between peers.
- Prepare the following info from the remote site: peer public IP, remote internal network(s), and the pre-shared key (shared secret).
Key Parameters to Decide
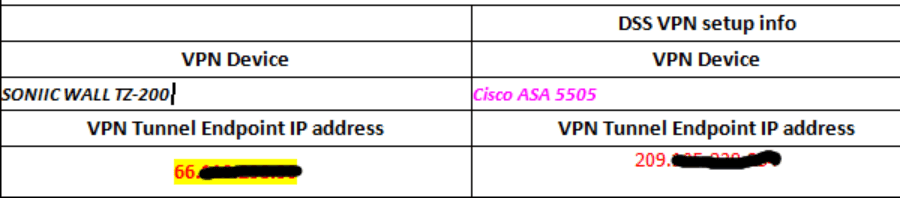
Peer IP information
- The peer IP should be the hardware or router IP. They are not the IPs behind the firewall or router.
- The left panel is the parameters on the client end. The right panel parameters are the parameters in the Database Mart firewall.
IKE Parameters
- Encryption:
DESor3DES(if AES is supported, prefer AES). - Authentication:
MD5orSHA(SHA/SHA1is preferred where available). - DH Group:
Group 1(modp768) orGroup 2(modp1024). - Lifetime (seconds): less than
86400(commonly28800= 8 hours).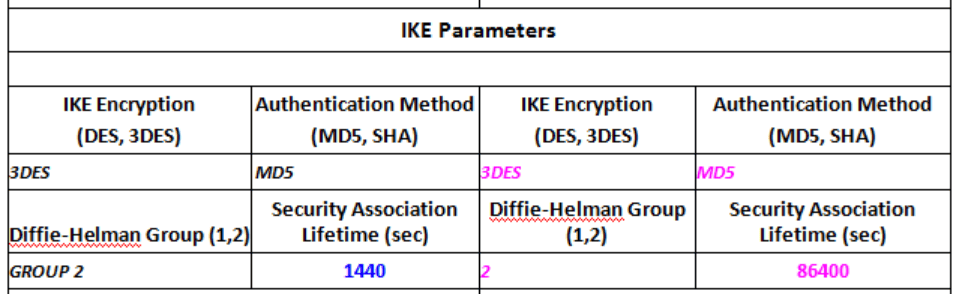
IPSEC Parameters - Encryption:
DESor3DES(again, AES if supported). - Authentication:
MD5orSHA. - PFS (if used): same DH Group as IKE or
none. - Lifetime (seconds): less than
86400(often3600or28800).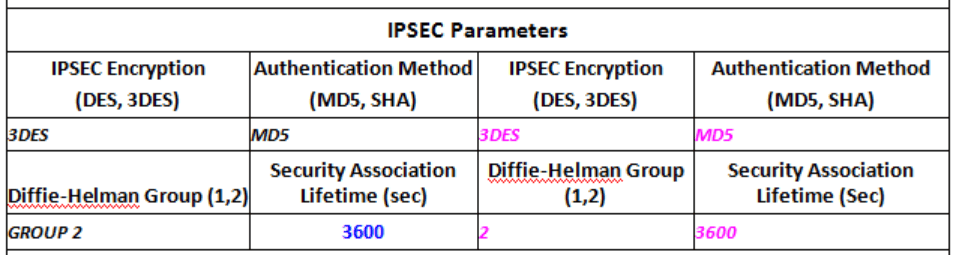
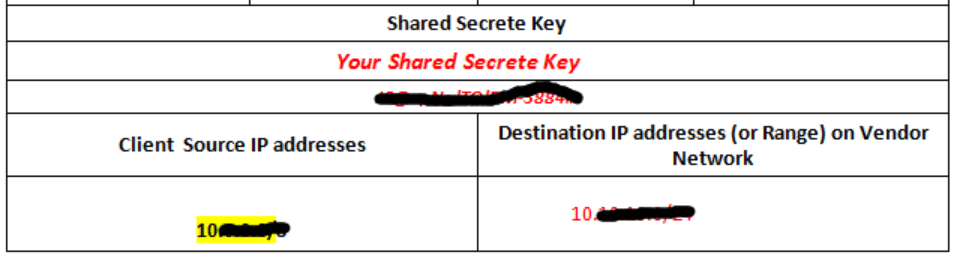
Other - Pre-shared key (shared secret) — must be identical on both devices.
- Local Networks / Remote Networks — the internal subnets that will be routed over the tunnel (no overlap).
Steps to Configure Site-to-Site VPN using ASDM
Step 1: Confirm ASA version and gather info
- Open ASDM and check the ASA software version: Device > System Information (or run
show versionin CLI). Make sure you have ASA 8.2.2 and up. You cannot connect your Windows clients if you have ASA 8.2.1 because of a Cisco software bug. - Collect the remote peer's public IP, the remote internal network(s) (e.g.,
192.168.10.0/24), and agree on the pre-shared key and IKE/IPsec parameter values with the remote admin.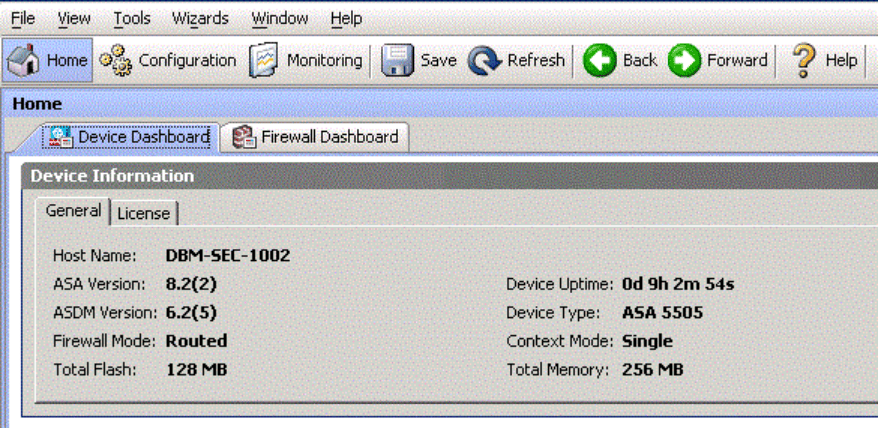
Step 2: Launch the IPsec VPN Wizard
- In ASDM: go to Wizards → VPN Wizards → IPsec VPN Wizard
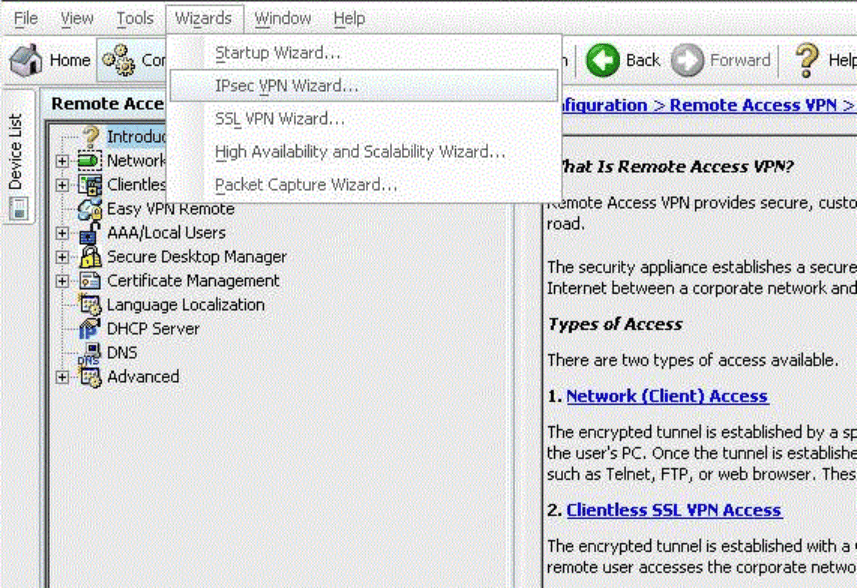
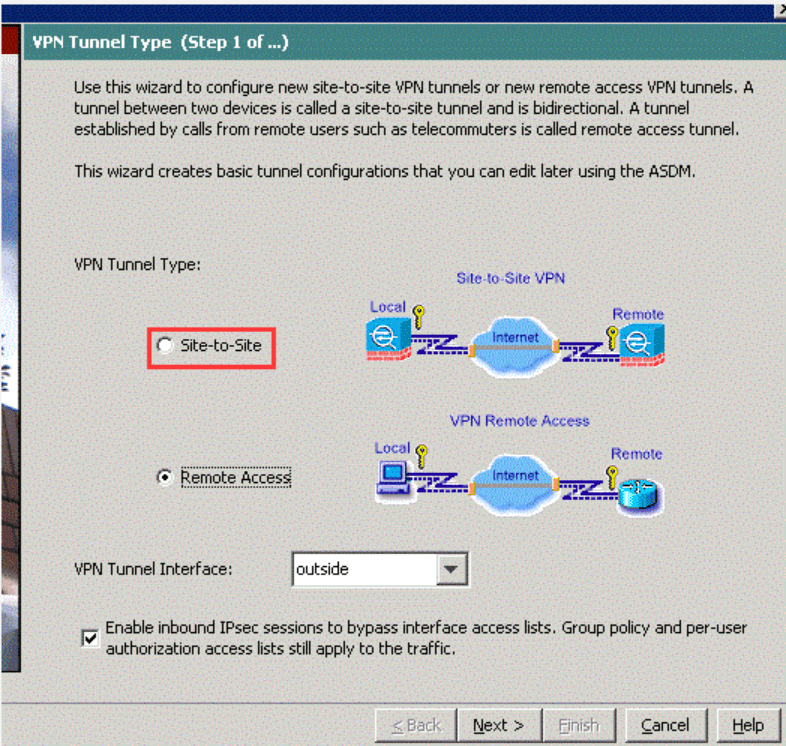
- When prompted for VPN Tunnel Type, choose Site-to-Site and click Next.
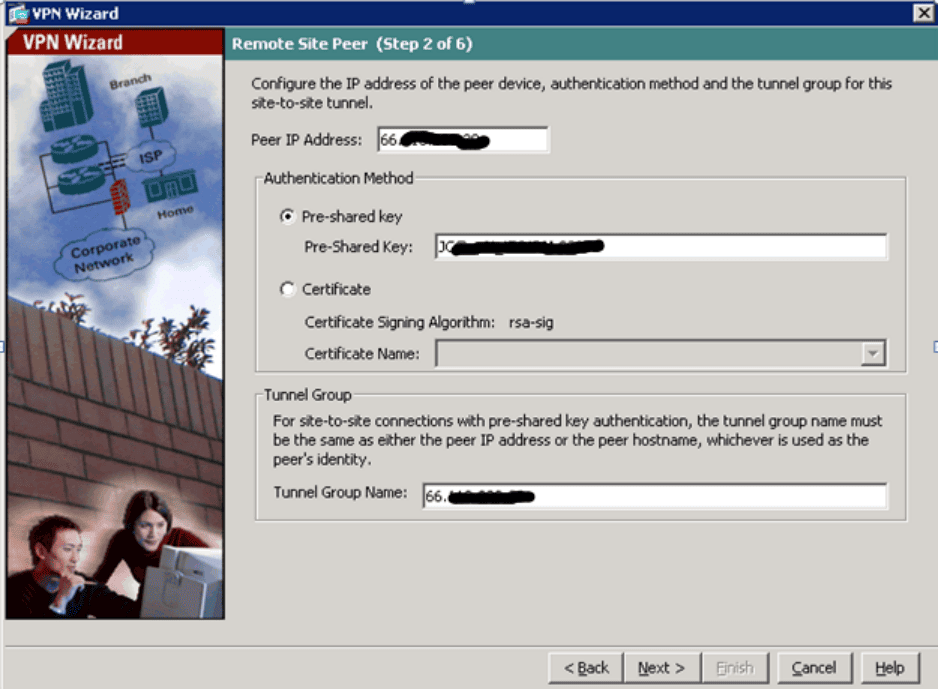
Step 3: Configure Remote Peer and Local endpoint
- Enter the remote peer IP address (the peer's public/WAN IP).
- Enter the agreed pre-shared key (shared secret).
Step 4: Define IKE and IPsec Policies
- IKE Policy: Choose the encryption, authentication, DH group and lifetime that you and the remote admin agreed on (e.g.,
3DES,SHA,Group 2, lifetime28800). Add or edit policies if needed.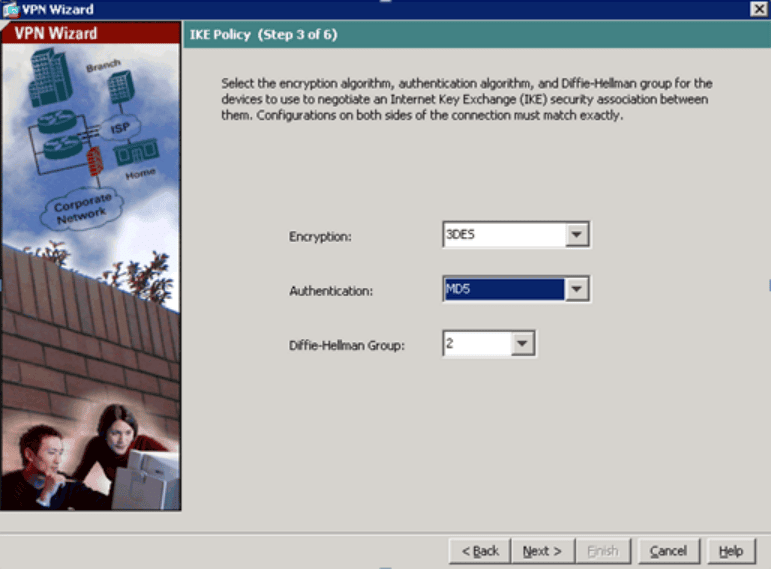
- IPsec Policy: Choose matching IPsec parameters (encryption/auth/PFS/lifetime). Keep values identical on the remote side.
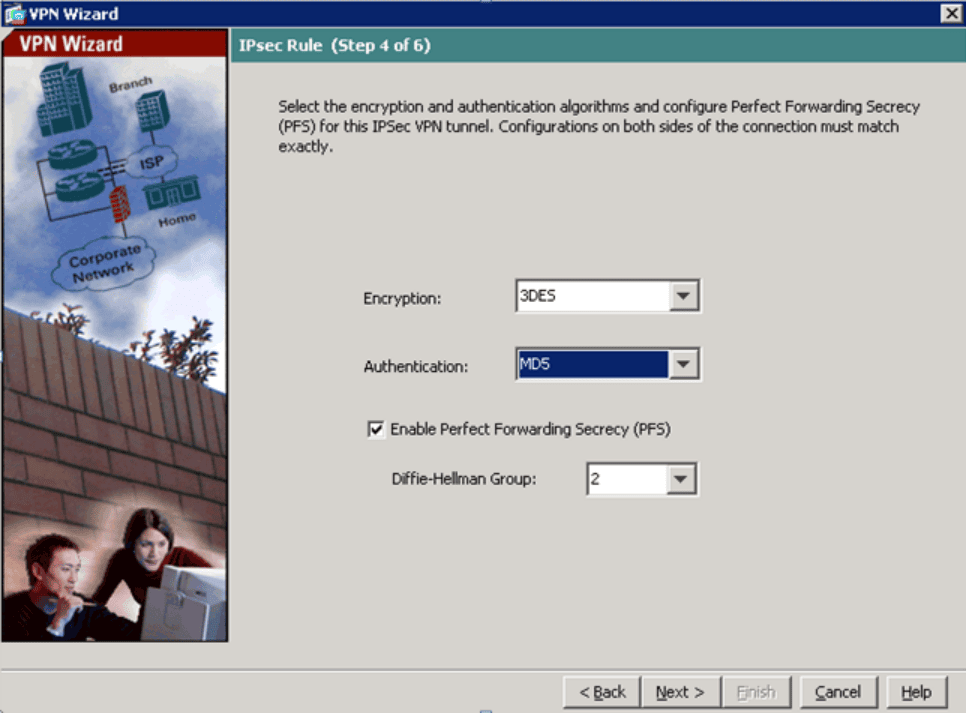
- Click Next to apply the policies to the tunnel configuration.
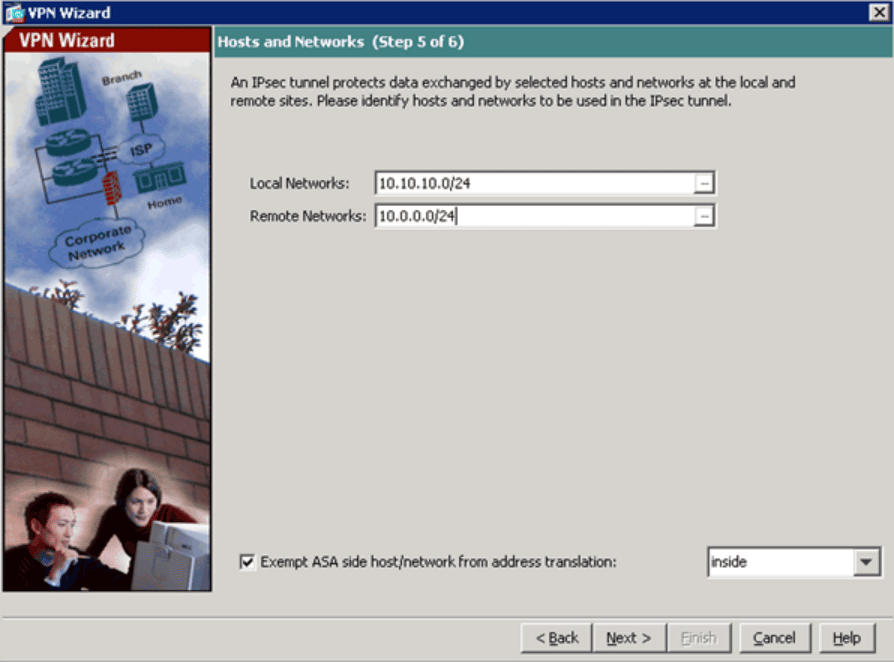
Step 5: Define Interesting Traffic
- Local Networks: specify the internal networks behind your ASA that should be accessible over the tunnel (e.g.,
10.10.0.0/24). - Remote Networks: enter the remote site's internal networks (provided by the remote admin).
- Confirm network definitions and click Next.
Step 6: Review, Finish, and Save Configuration
- The wizard will present a VPN summary showing peer IP, pre-shared key (masked), IKE/IPsec policies and local/remote networks. Carefully review every line.
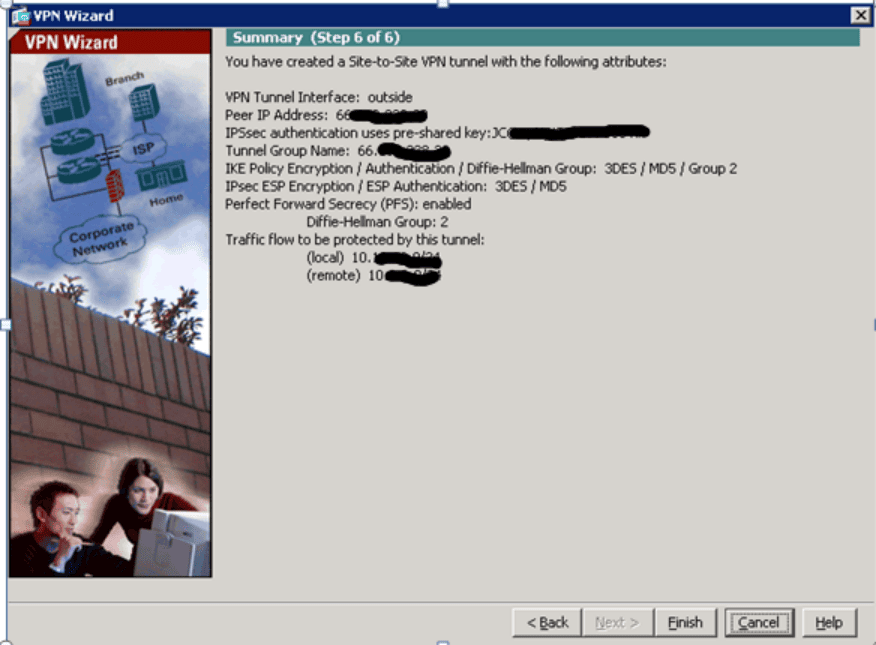
- Click Finish to install the configuration.
- Save to flash: In ASDM, go to File → Save running configuration to flash (or use CLI
write memory) so the VPN survives reboots.
Verify the tunnel and perform basic tests
Quick checks in ASDM
- Monitoring → VPN → VPN Statistics / Tunnel Details: check that the new tunnel appears and shows a status (e.g.,
UPoractive). - Use ping from hosts behind each side to targets on the opposite side to test data flow once the tunnel is up.
CLI verification (optional)
Run these commands from ASA CLI:
show crypto isakmp sa       # shows IKE (Phase 1) SAs
show crypto ipsec sa       # shows IPsec (Phase 2) SAs and byte counters
If isakmp SA is present but ipsec SA is not, check phase-2/ACLs or crypto map ACL (interesting traffic).
Related Keywords:
Cisco ASA5500 site to site VPN, Cisco ASA ASDM VPN setup, site to site VPN configuration Cisco ASA, Cisco firewall VPN setup tutorial, Cisco ASA site-to-site VPN wizard, Cisco ASA5500 IPsec VPN setup, site to site VPN Cisco ASDM step by step, ASA firewall VPN configuration guide, setup VPN between Cisco ASA and router, Cisco ASA site to site VPN example, how to configure VPN on Cisco ASA, Cisco ASA IPsec tunnel setup, Cisco ASA ASDM VPN configuration tutorial