


Kubernetes Clusters Hosting for Beginners: A Complete Step-by-Step Guide
Our Kubernetes service provides high-availability clusters, flexible node configurations, and a unified management platform, making it ideal for a wide range of scenarios — from microservices applications and AI training workloads to web services and large-scale distributed computing.
In this guide, we’ll walk you step by step through creating Kubernetes clusters, managing nodes via DBM panel, connecting servers, and upgrading, helping you get started quickly and manage your clusters efficiently to achieve stable business operations and flexible scaling.
Watch the Video: How to Order, Manage, and Connect Kubernetes Cluster
To help you get started quickly, we’ve prepared a short introduction video covering the essential steps and features of DBM Kubernetes Cluster Hosting. In this video, you’ll learn:
✔️ How to order Kubernetes Clusters
✔️ Exploring the control panel features
✔️ How to log in and connect to your cluster
Purchase Kubernetes Clusters
1. Select the Right Kubernetes Clusters Plan:
You can purchase a Kubernetes Cluster plan by selecting a suitable plan based on required hardware resources from our Kubernetes Clusters offerings. If our standard plans do not meet your requirements, don't hesitate to get in touch with us
to customize your server.
2. Confirm Your Kubernetes Clusters Order:
After clicking Order Now, you will be directed to the Order Confirmation Page, where you can confirm your server settings and choose a preferred billing cycle. You can also add any additional requirements in the Note section. Finally, review and submit your order.
3. Pay for Your Kubernetes Clusters
After confirming your dedicated hosting plan, simply place the order and complete the payment. Before making payments, your account information will be verified. If there are any security issues, the payment may not go through. In such cases, you can contact our Billing Team for assistance.
4. Wait for Kubernetes Clusters Deployment
Kubernetes cluster products require manual delivery. Depending on the number of servers, the delivery time ranges from 3 to 20 days. We will confirm the operating system, installed software, and specific versions with you via email before delivery.
Kubernetes Clusters Management Overview
Once your Kubernetes Clusters have been successfully deployed, you can easily manage it via the DBM Panel for Kubernetes Clusters.
In the table below, we’ll guide you through the key features and functions of the Kubernetes Clusters management interface.
| Tab Name | Sections | Introduction | Functions |
|---|---|---|---|
| Overview | Overview | This section displays the essential information of your package, including product, server name, billing cycle, configuration, payment method, price, created date, and due date. It also allows you to directly modify the Server server name, billing cycle, and payment method. | Product - Product Name Name - Server name, can be changed. Billing Cycle: Monthly, quarterly, annually, biennially billing cycle. The longer, the lower the price. Configuration - CPU/RAM/Disk/Bandwidth Payment Method: Support Credit Card and PayPal. It can be changed. Price – Recurring amount. Created – The date that the package is created Due Date – The date that the package expires |
| Service Information | Service Information | The Service Information section lists the server connection information for all nodes in the clusters | Role - Master server / Node Server Public IP – An IP address that is globally unique and accessible over the internet. - Private IP – An IP address used within a local network, not accessible directly from the internet. - Username/Password – the server login credentials for authentication. -Operating System – the installed OS running on the server. |
Kubernetes Clusters Server Connection Made Easy
Kubernetes clusters are deployed on servers running the Ubuntu operating system. Here, we will show how to connect from Windows to Ubuntu Server
Connect from Windows to Ubuntu Server
The mostly used method to connect to Linux from Windows is using SSH clients, such as PuTTy and Xshell. Here we take PuTTY as an example to introduce how to log in to a Linux server from a local Windows computer.
1. Save a server login profile in PuTTY
In PuTTY, you can create and save profiles for different remote server connection information. This is so that you don't have to manually configure the connection information each time you initiate a connection.
- Download PuTTy on your local computer.
- Double-click putty.exe to open the PuTTY client.
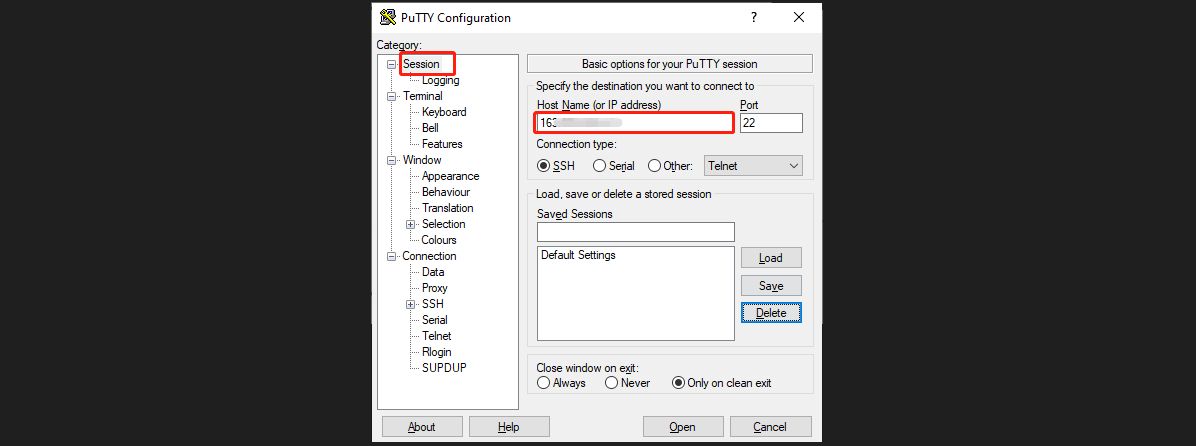
- In the PuTTY Configuration window, enter the following content as shown in the figure below.
Under Session Category- Host Name (or IP address):The public IP of the Linux server.
- Port: The default port is 22. If the port has been changed, please use the updated one.
- Connection Type: Select SSH.
Note: The connection information can be found on the overview page in the control panel. If you have difficulty in finding the right information, please refer to the guide on how to manage your server.
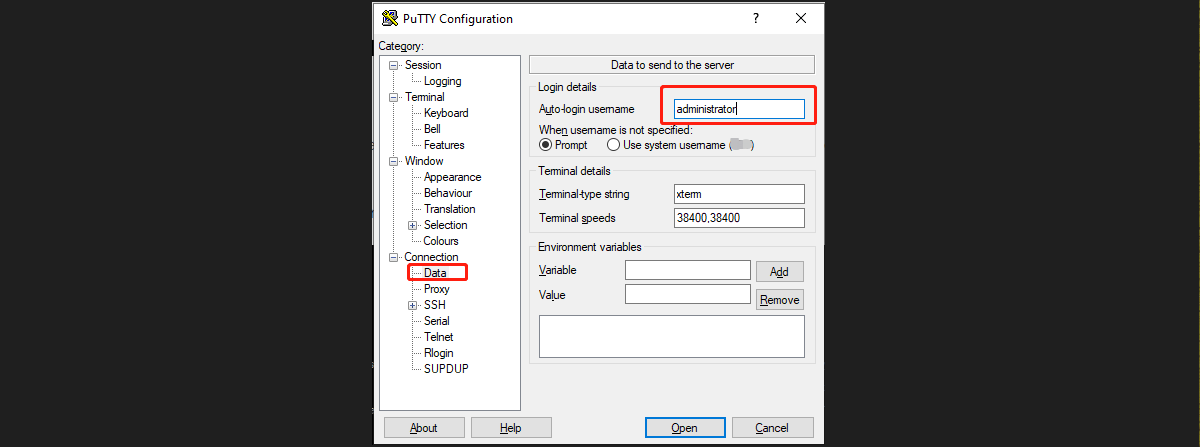
Under Connection Category - Data
- Auto-login username: Enter the username you are about to log in to. In this example, we use an administrator.
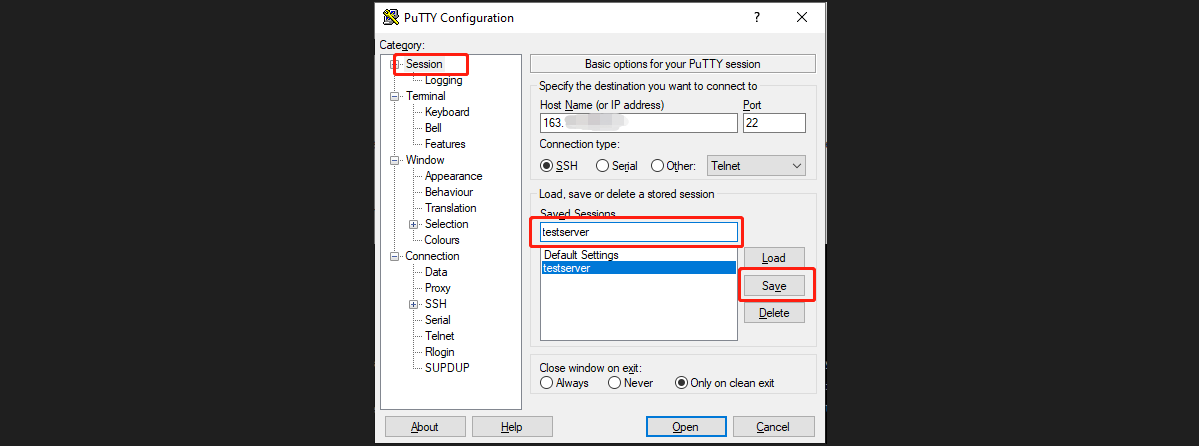
Return to Session Category
- Saved Sessions: Configure a name for this session and click Save. Each time, you can directly double-click Saved Sessions to log in to the server.
2. Log in to the Linux Dedicated server
- When you are taken to the PuTTY running interface, which prompts the following:
Using username "auto-login username"
auto-login name@IP's password:- Enter the password after "password" and press Enter. The entered password is not displayed by default, as shown in the figure below. In the SSH session, right-clicking the mouse will paste the content in the clipboard. If you have copied a password, simply right-click after the password line and press Enter. Then, you should be able to log in to the session.

Initial Checks After Login
After you have successfully connected to the Dedicated server, you can check:
- Whether the operating system version, CPU, RAM, disk, bandwidth, add-ons, and other resources match your purchase.
- Whether all nodes and all component services are running normally.
- After you confirm everything is fine, you are free to install any software you need and start your project.
How to Check if Nodes and Component Services are Running Normally
On Master0, run ‘kubectl version’ in the console to view the Kubernetes version.
On Master0, run ‘kubectl get componentstatus’ in the console to check the status of Kubernetes components.
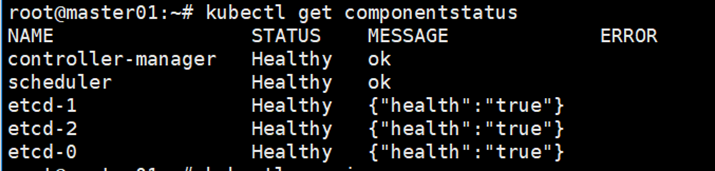
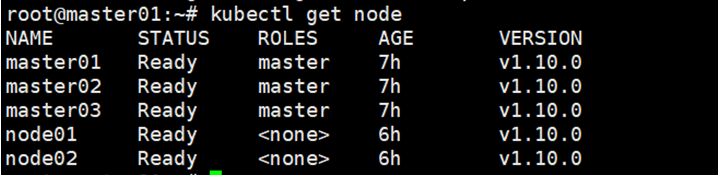
Run ‘kubectl get node’ to view the node status.
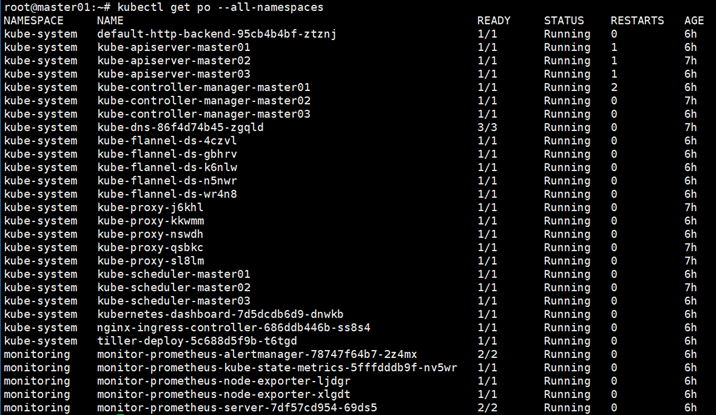
Run ‘kubectl get pod –all-namespaces’ to get the status of all pods.
Kubernets Clusters Usage Guide
Kubernetes Upgrades
When your business grows or your resource requirements increase, you can contact customer support to upgrade a specific resource or add more nodes.
1. Purchase Add-ons Individually
If you only need to increase a specific resource (such as CPU, RAM, storage, or bandwidth), please contact us.
3. Horizontal Scaling
You can also expand your resources by adding one or more physical servers, thereby increasing overall computing power and system capacity. Horizontal scaling not only supports higher concurrent processing and large-scale data storage but also enables load balancing and redundant backups, improving the stability and reliability of your business operations.
| Addon Options | Price | Configurations |
|---|---|---|
| Additional Master Server | $99/m | E3-1220 CPU, 16GB RAM, 240GB SSD + 480GB SSD |
| Additional Node Server | $199/m | E5-2670 CPU, 128GB RAM, 240GB SSD + 2*960GB SSD + 2TB SATA |
| Additional Customized Server | Dedicated Server offerings | Please contact us with your specific requirements |
Kubernetes Clusters Usage Restrictions
To provide you with a more stable and secure experience, we have established certain usage restrictions for our Kubernetes Clusters services. These limitations are designed to prevent resource abuse and potential risks, ensuring that all customers can operate their businesses in a fair and reliable environment.
Below are some common usage restrictions:
| Category | Examples / Restrictions |
|---|---|
| Prohibited and Restricted Content | Pornographic content; Illegal or violent content; Hate speech; Illegal or defamatory content; Fraud and phishing |
| Network Security and Abuse | Network attacks; Vulnerability scanning; Bypassing security measures; Unauthorized access; System interference; Abuse of non-public APIs; Unauthorized promotion |
| Copyright and Intellectual Property Infringement | Copyright infringement; IRC services; BT/P2P programs |
| Resource Abuse and Service Violations | Resource abuse / high resource consumption; Unauthorized network services; Spam |
These actions will cause direct suspension/cancellation/termination of your service without the possibility of refund. You can refer to the Terms of Service for more details.