


How to Apply an SSL on Windows IIS
Introduction
Enabling SSL on your Windows IIS server is vital for securing web traffic, enabling HTTPS, and boosting user trust.
This guide will walk you through the SSL setup in Windows (IIS) using a .pfx file. Whether you already have a certificate or plan to buy an SSL certificate, these steps will help you install and bind SSL correctly.
Prerequisites
Before starting, ensure you have:
- .PFX Certificate File & Import Password
- Access to Windows Server with IIS Role Installed
- (Optional) Certificate Purchased / Exported
If you don’t already have a .pfx, you may need to buy an SSL certificate, export it from your CA or control panel, or choose a cheap SSL certificate before proceeding.
Steps to Apply an SSL on Windows IIS
Step 1: Import SSL from the .pfx File
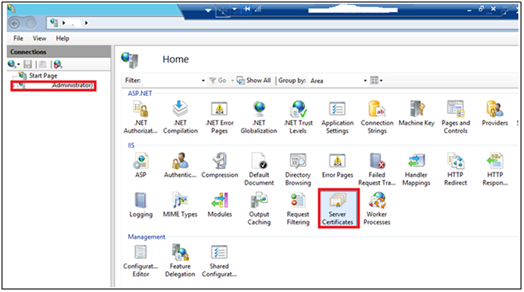
Log in to the server where your website is located. Then open IIS and click Server Certificate.
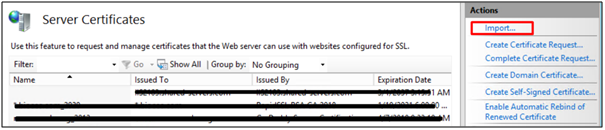
Click Import.
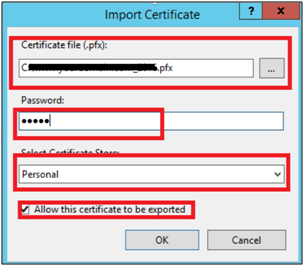
Specify the certificate file (.pfx file).
Fill in the import password of the .pfx file.
Click OK to complete the certificate import process.
Step 2: Set Certificate Bindings
2.1 Open the site binding window
Choose your site. Click Bindings.
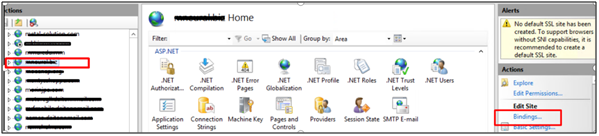
Click Add.
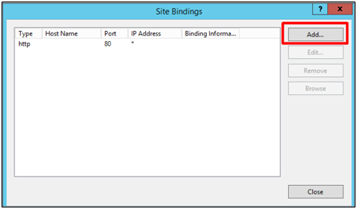
2.2 Add the SSL binding
Configure the following required fields:
Type: https.
IP address: If Windows Server 2008 is used, please assign a dedicated IP to the site. For other types of servers, a designed IP is not necessary.
Port: 443.
Require Server Name Indication: Please check the option if Windows Server 2012 R2 / 2016 / 2019 is used.
SSL Certificate: Choose the SSL imported before.
When all settings are configured, click OK.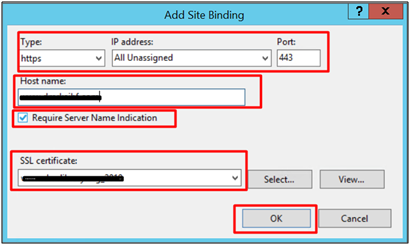
Step 3: Verify SSL Installation
Your certificate should now be installed. You can navigate your site (https://YourDomain.com) in a web browser and check for the padlock to verify the installation.
