

VPS Hosting for Beginners: A Complete Step-by-Step Guide
A VPS (Virtual Private Server) provides isolated resources and full control, offering performance and flexibility between shared hosting and a dedicated server. We offer Linux VPS for web and development, Windows VPS for Remote Desktop and Windows apps, and specialized VPS for databases, streaming, and other resource-heavy workloads.
This beginner-friendly guide walks you through VPS Hosting step by step — from choosing the right plan and completing your order to smooth deployment, easy connection via remote desktop or SSH, simple management through the control panel, and upgrading resources as your needs grow.
Watch the Video: Step-by-Step VPS Tutorial: Order & Manage & Connect Easily
To help you get started quickly, we’ve prepared a short introduction video covering the essential steps and features of DBM VPS Hosting. In this video, you’ll learn:
- VPS Ordering Process – How to select the right plan, complete the order, and confirm your VPS.
- VPS Deployment & Control Panel Features – How to navigate the DBM Panel, manage your VPS, configure settings, and access key features.
- Windows & Linux VPS connection methods (RDP & PuTTY) – How to connect to your VPS via Remote Desktop (Windows) or SSH (Linux).
Watch the video below to get a clear, step-by-step overview and start using your VPS smoothly.
VPS Purchase
1. Select the Right VPS Hosting Plan:
You can buy a VPS by selecting a suitable plan based on your preferred operating system and required hardware resources from our VPS offerings.
2. Confirm Your VPS Server Order:
After clicking Order Now, you will be directed to the Order Confirmation Page, where you can configure your server settings, such as server login password, Operating System, Add-ons ( including CPU/RAM/Disk, bandwidth, database, backup), billing cycle, etc. You can also add any additional requirements in the Note section. Finally, review and submit your order. All of these settings can be modified later through the DBM Panel.
| Additional CPU Core | $2.00/month/Core | Upgrade limited to 16 cores |
| Additional Memory | $2.00/month/GB | Upgrade limited to 32GB |
| Additional Disk Space | $2.00/month/20GB | Additional C: Drive Space |
| Bandwidth Upgrade | Upgrade to 1000Mbps(Shared): $10.00/month | The bandwidth of your server represents the maximum available bandwidth. Real-time bandwidth usage depends on the current situation in the rack where your server is located and the shared bandwidth with other servers. The speed you experience may also be influenced by your local network and geographical distance from the server. |
| Image .vhdx File Download | $25.00/Server one time fee | Download the image file to the client's local computer. |
| Additional Dedicated IP | $2.00/month/IP (IPv4 or IPv6) | Max 2 per plan, purpose required. |
| Remote Data Center Backup(Windows Only) | $14.99/month | Twice per week, every Wednesday and Saturday. We will use Backup For Workgroups to backup all your SSD (C: partition) file system to our remote data center backup servers. You can restore the backup files in your server at any time by yourself. |
3. Pay for Your VPS Server
After confirming your VPS hosting plan, simply place the order and complete the payment. Before making payments, your account information will be verified. If there are any security issues, the payment may not go through. In such cases, you can contact our Billing Team for assistance.
4. Wait for VPS Deployment
Once payment is successful, the system will automatically deploy your Windows VPS or Linux VPS within 5–10 minutes. In case of stock shortage or deployment failure, please be patient while our Support Team resolves the issue, usually within 24 hours. If you need urgent access, you may contact Support directly.
VPS Management Overview
Once your VPS has been successfully deployed, you can easily manage it via the DBM Panel for VPS.
In the table below, we’ll guide you through the key features and functions of the VPS management interface.
| Tab Name | Sections | Introduction | Functions |
|---|---|---|---|
| Overview | Server Connection Information | This section provides the necessary details for accessing your server, including: IP, Port, Login Name, Login Password, and Operating System. It offers quick tools to reset passwords, add IPs, and access the connection KB. | Shared IP – The IP address assigned to your server, shared among multiple users. Shared IP vs Dedicated IP Primary IP - the unique network address of your server. Access Port – the network port used for remote access. Login Name/Login Password – the credentials for authentication. Operating System – the installed OS running on the server. Dedicated IP - contact us to request for dedicated IPs here. Connections: - Windows VPS Connection: Use Primary IP:Port (e.g., 108.111.111.11:3389) to connect to VPS using RDP - Linux VPS Connection: (Ubuntu/Debian) use sudo -i to switch to the root user |
| Overview | This section displays the essential information of your package, including product, VPS server name, billing cycle, configuration, payment method, price, created date, and due date. It also allows you to directly modify the VPS server name, billing cycle, and payment method. | Product - Product Name Name - Server name, can be changed. Billing Cycle: Monthly, quarterly, annually, biennially billing cycle. The longer, the lower the price. Configuration - CPU/RAM/Disk/Bandwidth Payment Method: Support Credit Card and PayPal. It can be changed. Price – Recurring amount. Created – The date that the package is created Due Date – The date that the package expires |
|
| Real-Time Status | This section shows the current server status and resource usage in real time, helping you monitor performance and ensure smooth operation. If one or more resources consistently remain at 80% or higher, you can go to the Scaling section to upgrade to a higher plan or purchase add-ons for better performance. | CPU/Memory/Disk - Displays the current usage of server resources as a percentage, allowing you to monitor performance and identify potential bottlenecks. Status - Running – The server is powered on and actively running, with all processes operational. - Shut Off – The server is completely powered down and not running any processes. - Paused – The server’s processes are temporarily frozen and its state is saved to disk; it can be resumed later without losing data. |
|
| Scaling | This section allows clients to upgrade their plan or purchase add-ons to get more resources. Normally, the system will automatically allocate resources after your payment, usually resulting in only 3–5 minutes of downtime. | Upgrade - Click the button to choose a higher plan and upgrade. Add-ons - Add/Remove additional CPU cores, memory, and disk space. Note: If the host lacks sufficient resources, migration to a higher-capacity host is required, and the IP will change. The process may take longer, but it is normally completed within 24 hours. |
|
| Networking | Website Management | This module is specifically designed for hosting web services and supports accessing internal servers via domain names. It maps your public domain name to the web service port (typically 80 or 443) of the internal virtual machine. | How it works - Clicking this button will display a network topology diagram; the system uses a reverse proxy mechanism for mapping. When external requests access your domain, the gateway will automatically forward traffic to the internal server IP and port you specify. Add Domain - Clicking this button will create a mapping. You can choose: Temporary test domain (Provided by the platform for quick online testing.) or Custom domain (Binds a valid domain you already own and points it to an internal IP:Port.). |
| Port Mapping Management | This module is used for general non-website applications (such as SSH, databases, remote desktop, etc.). It allows direct access to corresponding services on internal network servers through specific port mapping of public IP addresses. | How it works - It utilizes NAT (Network Address Translation) technology. For example, you can map port 2222 on the public network to port 22 of a virtual machine on the internal network, and then connect remotely by accessing the public IP address:2222. Add Port Mapping - Click this button to configure a new mapping rule. You need to define the external port (the port number used for public network access) and the internal port (the port number of the service actually running inside the virtual machine). |
|
| Server Management) | Server Control | The Server Control section displays the server status and uptime, and provides control options such as Reset, Turn Off, Shut Down, Power On, Pause, Resume, and Reboot. | Status - Running/Shut Off/Paused/ Uptime - Indicates how long the server has been running since it was last started, helping you monitor stability and performance. Actions - Reset VPS – Immediately turns off and restarts your VPS without saving data. - Turn Off VPS – Stops your VPS and terminates all processes without saving data. - Shut Down VPS – Powers off your VPS after saving changes and closing processes. - Power On VPS – Turns on VPS; use this after it has been shut down or turned off. - Pause VPS – Temporarily freezes all processes and saves the state to disk. - Resume VPS – Continues running your VPS from the paused state without losing data. - Reboot VPS – Gracefully shuts down and restarts your VPS, saving data and terminating processes properly. When the server experiences issues such as freezing or a black screen, you can try rebooting it to resolve the problem. |
| OS Reinstallation | This section allows clients to reinstall the server’s operating system (OS) to restore it to a clean state, update to a different version, or fix system issues. A reinstallation will erase all data from the server, so please make sure you back up your data to your local machine before taking this action. | Reinstall - Choose an OS and confirm the reinstallation. We support up to 3 OS reinstallations within 7 days. If you require additional reinstalls, please contact our team for assistance. |
|
| Events | Events | The Events section records the operation logs related to this package, capturing all activities performed through the control panel. | Input a keyword and click the search icon to search for operations. It helps users track actions such as configuration changes, restarts, upgrades, or other management operations. |
VPS Connection Made Easy
Connect from Windows to Windows VPS
The most convenient way to connect to a Windows VPS from a Windows computer is an RDP connection. If you prefer a video tutorial, watch the YouTube video How to Access Windows VPS Server via RDP. We will guide you step by step to access a Windows VPS via RDP.
1. Open RDP on the local computer
Enter Remote Desktop or RDP in the search box on the taskbar, and then click Remote Desktop Connection.
2. Input VPS Server IP & Port
Connect to your Windows Server using IP:Port format. For example, if your IP is 108.1.1.1 and the port is 8888, enter 108.1.1.1:8888.
You can get the login password, port on the Overview page.
3. Enter credentials to create a remote connection
Enter the Login Name and the Login Password to log in to the server. To make it easier to log in next time, you can check Remember me. Then click OK below to create the remote connection. A window that cannot verify the identity of the remote server may pop up. You can check the Don't ask me again for connection to this computer option and click Yes to connect to the remote server.


Connect from Windows to Linux VPS
The mostly used method to connect to Linux from Windows is using SSH clients, such as PuTTy and Xshell. Here we take PuTTY as an example to introduce how to log in to a Linux server from a local Windows computer.
1. Save a VPS server login profile in PuTTY
In PuTTY, you can create and save profiles for different remote server connection information. This is so that you don't have to manually configure the connection information each time you initiate a connection.
- Download PuTTy on your local computer.
- Double-click putty.exe to open the PuTTY client.
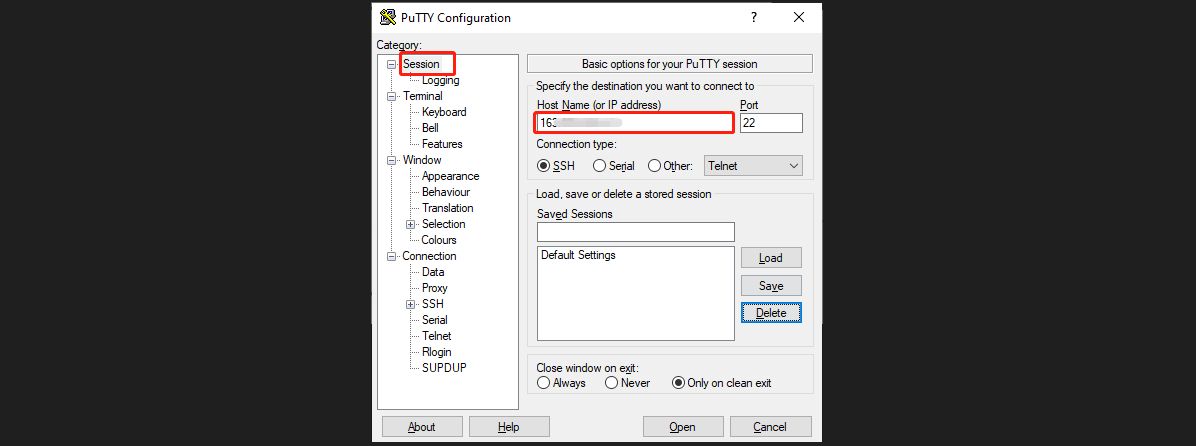
- In the PuTTY Configuration window, enter the following content as shown in the figure below.
Under Session Category- Host Name (or IP address):The public IP of the Linux server.
- Port: The default port is 22. If the port has been changed, please use the updated one.
- Connection Type: Select SSH.
Note: The connection information can be found on the overview page in the control panel. If you have difficulty in finding the right information, please refer to the guide on how to manage your server.
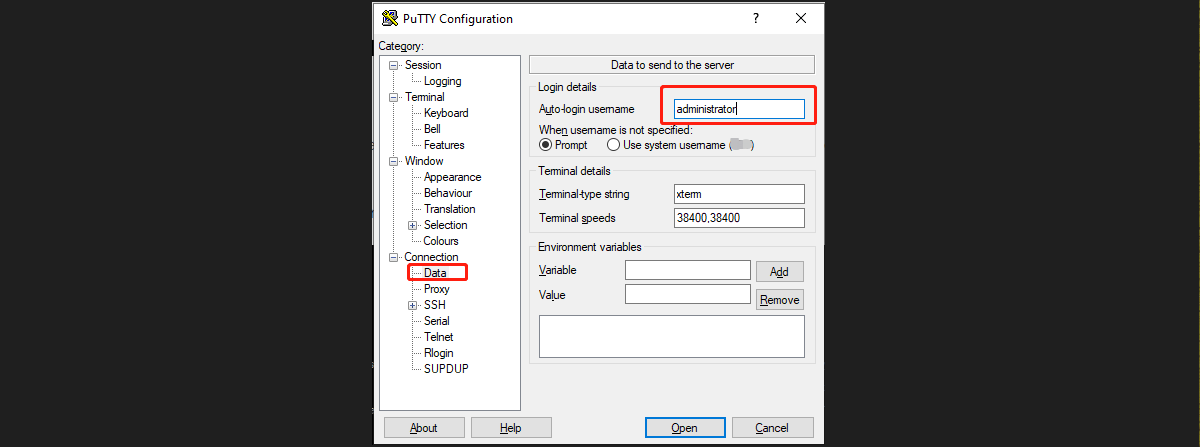
Under Connection Category - Data
- Auto-login username: Enter the username you are about to log in to. In this example, we use administrator.
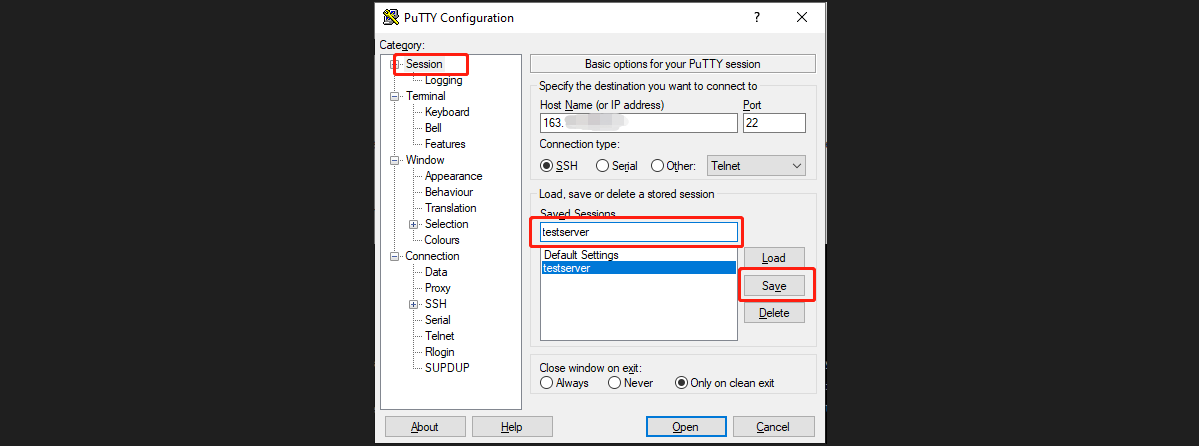
Return to Session Category
- Saved Sessions: Configure a name for this session and click Save. Each time, you can directly double-click Saved Sessions to log in to the server.
2. Log in to the Linux VPS server
- When you are taken to the PuTTY running interface, which prompts the following:
Using username "auto-login username"
auto-login name@IP's password:- Enter the password after "password" and press Enter. The entered password is not displayed by default, as shown in the figure below. In the SSH session, right-clicking the mouse will paste the content in the clipboard. If you have copied a password, simply right-click after the password line and press Enter. Then, you should be able to log in to the session.

Initial Checks After Login
After you have successfully connected to the VPS server, you can check:
- Whether the operating system version, CPU, RAM, disk, bandwidth, add-ons, and other resources match your purchase.
- After you confirm everything is fine, you are free to install any software you need and start your project.
Tips:
Memory: When you first log in, you might notice that the displayed memory is less than what you purchased. This is expected because our system uses dynamic memory allocation. As your VPS workload increases, the system will automatically provide more RAM to ensure smooth performance.
CPU Usage: It’s normal for CPU usage to be higher during the first two hours after setup, especially on Windows VPS, as the system may be installing updates in the background.
Disk: The default virtualization interface may show the disk type as HDD; however, the actual storage is Pure SSD/NVMe, providing better performance.
Bandwidth: Shared bandwidth is provided. The bandwidth of your server represents the maximum available bandwidth. Real-time bandwidth usage depends on the current situation in the rack where your server is located and the shared bandwidth with other servers. The speed you experience may also be influenced by your local network and geographical distance from the server.
Other VPS Connection Methods
Here, we only show how to connect from Windows to Windows VPS and from Windows to Linux VPS.
We also have many knowledge base (KB) articles covering connections from different devices and using various tools, such as macOS, mobile devices, or third-party software like AnyDesk.
For detailed instructions on these methods, please visit the VPS usage guide section.
VPS Usage Guide
Windows VPS Guidance
Linux VPS Guidance
VPS Upgrades
As your business grows or resource demands increase, you can upgrade your VPS hosting package directly via Control Panel → Overview → Scaling: Log in to the control panel and upgrade.
1. Upgrade VPS Plan
If your CPU, RAM, storage, or bandwidth usage consistently reaches 80% or more of your current package, it is recommended to upgrade to the next higher VPS hosting plan to ensure optimal performance.
Log in to the control panel and upgrade.
2. Purchase Add-ons Individually
If you only need to increase a specific resource (such as CPU, RAM, storage, or a dedicated IP), you can purchase add-ons individually to meet your requirements.
Log in to the control panel and upgrade.
3. Upgrade to a Dedicated Server
For high-performance needs or larger workloads, you can upgrade your VPS server to a dedicated server. Dedicated servers provide higher performance and exclusive resources, suitable for applications requiring high reliability and large-scale computing. To upgrade, please contact our team. We can recommend the most suitable server for your needs. Please note that upgrading requires a new machine, data migration, and your IP address will change. Explore Dedicated Server Offerings.
VPS Usage Restrictions
To provide you with a more stable and secure experience, we have established certain usage restrictions for our VPS services. These limitations are designed to prevent resource abuse and potential risks, ensuring that all customers can operate their businesses in a fair and reliable environment.
Below are some common usage restrictions:
| Category | Examples / Restrictions |
|---|---|
| Prohibited and Restricted Content | Pornographic content; Illegal or violent content; Hate speech; Illegal or defamatory content; Fraud and phishing |
| Network Security and Abuse | Network attacks; Vulnerability scanning; Bypassing security measures; Unauthorized access; System interference; Abuse of non-public APIs; Unauthorized promotion |
| Copyright and Intellectual Property Infringement | Copyright infringement; IRC services; BT/P2P programs |
| Resource Abuse and Service Violations | Resource abuse / high resource consumption; Unauthorized network services; Spam |
These actions will cause direct suspension/cancellation/termination of your service without the possibility of refund. You can refer to the Terms of Service for more details.